Summary
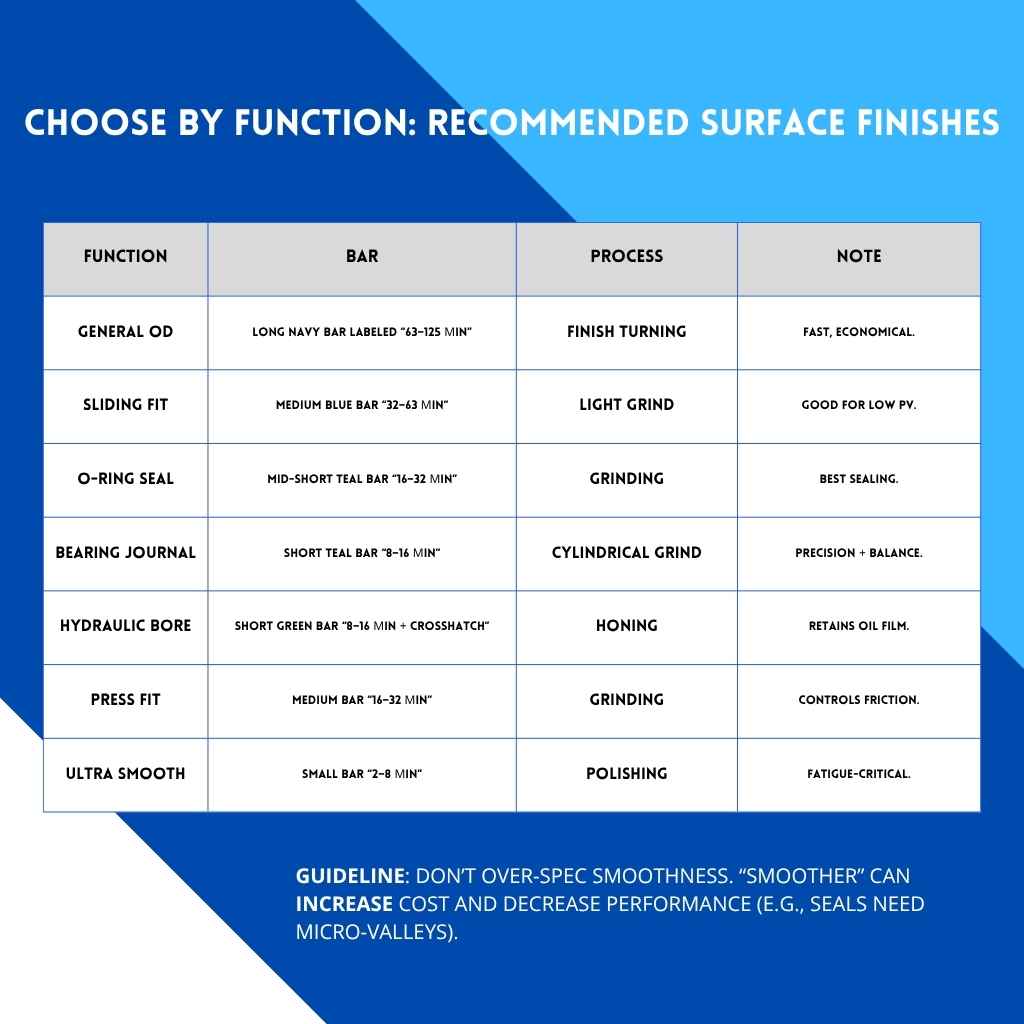
Finish is functional. It governs friction, wear, sealing, fatigue, and assembly — not just cosmetics. Pick by function, not habit. Choose grinding, honing, or polishing based on what the part must do (seal, slide, rotate, press-fit, carry load). Specify clearly. Call out which surfaces, how they’re measured, and why (e.g., “honed bore for crosshatch/oil retention”). Optimize total cost. The cheapest finish is the one that meets function with the fewest setups, hand-offs, and surprises. Baxter integrates precision turning, grinding, and honing in-house — so dimension, texture, and lead time stay under one controlled process plan.
Function First
Every surface finish impacts friction, wear, and sealing performance.
Process by Purpose
Select grinding, honing, or polishing based on function, not habit.
Specify Clearly
Define which surfaces need finish control and how to measure them.
Cost Efficient
Choose the simplest process that meets performance targets.
Integrated Precision
In-house finishing at Baxter keeps quality, cost, and lead time aligned.
Surface Finish 101: Ra vs Rz (and Lay)
Surface finish describes the microscopic peaks and valleys left by machining/finishing. The three most useful concepts:
- Ra (Roughness Average) – the arithmetic average of absolute deviations from the mean line. Simple, common, easy to compare.
- Rz (Average Maximum Height) – average peak‑to‑valley across several sampling lengths; often correlates better with sealing/wear than Ra alone.
- Lay (directionality) – the dominant pattern left by the tool (circumferential for turning, crosshatch for honing). Lay often matters as much as Ra.
Units & quick conversion
- 1 micrometer (μm) = 39.37 microinch (μin).
- Typical drawing specs in North America use μin Ra; be explicit.
Rule: If function depends on lubrication film or sealing, call out how to measure (direction and location) and, if relevant, lay

A Simple Decision Tool
-
Is the surface a precision bore?
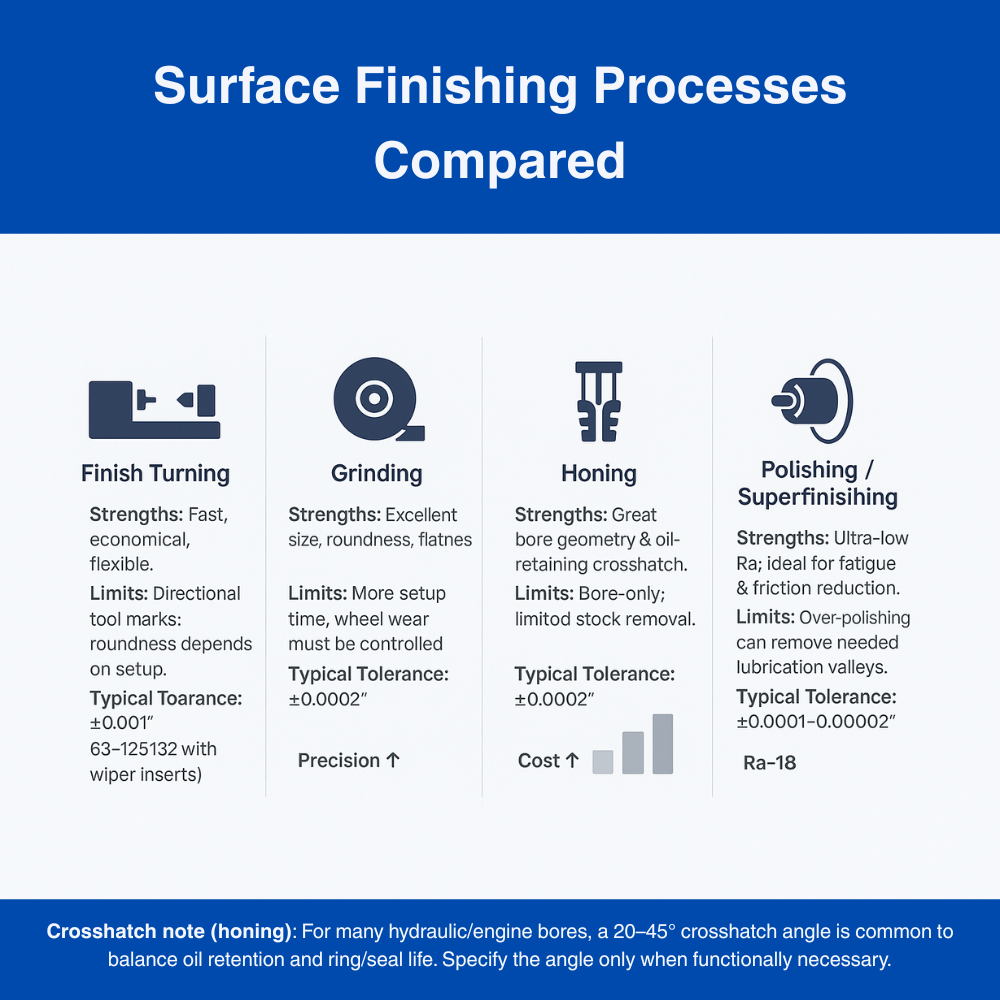
→ If yes, start with honing (functional crosshatch + geometry). -
Is it a rotating/rolling journal or critical flat?
→ Grinding controls size, roundness/flatness, and finish. -
Is it non-critical geometry with moderate finish needs?
→ Finish turning (possibly wiper inserts) wins on cost. -
Do you need ultra-low friction or fatigue resistance?
→ Polish/superfinish—but confirm lubrication film needs first. -
Could one setup do it all?
→ Consolidate (turn → grind/hone) in-house to cut lead time and variation.

Specifying Finish on Drawings
Reminder: Identify which surfaces carry the requirement, how to measure (direction), and why (process/functional note) if critical.
Good general callout (turned OD, non‑critical)
- Surface: Ø1.000–1.020 OD (Zone A) - Finish: Ra 32–63 μin (measured circumferentially) - Note: Cosmetic only; function not sealing/bearing
Bearing journal
- Surface: Journal B (Ø0.9980–0.9985) - Process: Cylindrical grind - Finish: Ra 8–16 μin (measured along axis) - Form: Roundness ≤ 0.0002; Total indicated runout ≤ 0.0003 to datum A
Hydraulic bore
- Surface: Bore C - Process: Hone after heat treat - Finish: Ra 8–16 μin, crosshatch 30–40° - Size: 1.0000/1.0004; Cylindricity ≤ 0.0003
Press‑fit seat
- Surface: Seat D - Finish: Ra 16–32 μin - Note: Avoid polishing; finish supports press‑fit friction
Cost, Lead Time & Risk—What Really Moves Piece Price
- Cycle time vs. setup time: Grinding/honing add setup but can reduce scrap and rework on tight features.
- Hand-offs: Shipping to a second vendor adds days and handling risk; in-house finishing keeps WIP short and consistent.
- NRE & repeatability: Purpose-built arbors/fixtures for grinding/honing amortize quickly on repeat work.
- “Smoothness tax”: Ra 16 everywhere is rarely necessary; reserve it for functional zones to avoid doubling cycle time.
- Pragmatic rule: Start with the least expensive process that meets function. Step up only when function proves you need it.
Metrology That Matches Function (and avoids “false rejects”)
- Instrument choice: Use a calibrated stylus profilometer; verify tip radius and filter cutoff match your spec.
- Direction of trace: Take the measurement along or across the lay according to the callout; record this in the report.
- Sampling length: Keep sampling length consistent; outlier spikes can distort Ra—consider Rz or Rt when peaks/valleys matter for sealing.
- Bores: For honed bores, measure at multiple angular positions and depths; verify crosshatch angle visually.
- MSA (Measurement System Analysis): Run GR&R on critical finish measurements to ensure the gauge—not the process—isn’t the source of variation.
- Capability: Track Cp/Cpk on key diameters and finish-critical features to maintain predictable quality.
Common Pitfalls & Easy Fixes
- “Ra 16 on the whole part.”
Fix: Limit strict finishes to the functional zones only. - No measurement direction/lay.
Fix: Add “measured along axis” (for journals) or “circumferentially” (for turned ODs); specify crosshatch when needed. - Threads or shoulders with no relief.
Fix: Add proper thread relief; it protects finish tools from crashing into corners. - Bore too deep for stable boring.
Fix: Move finish to honing; you’ll gain straightness + surface function. - Over-polishing a sealing surface.
Fix: Keep 16–32 μin for seals unless validated otherwise.
Implementation Roadmap (30/60/90)
0–30 Days — Assess
- Identify 2–3 parts with sealing/bearing complaints or long lead times.
- Map finished surfaces by function (seal, slide, rotate, press).
- Gather current Ra/Rz data and reject reasons.
31–60 Days — Engineer
- Rewrite surface blocks with functional zones and measurement directions.
- Move critical bores to honing; journals/flats to grinding; relax non-functional areas.
- Update inspection plans; add crosshatch verification on bores.
61–90 Days — Prove & Scale
- Pilot the new specs on one family of parts; capture Cp/Cpk, scrap, and lead time.
- Roll out to similar SKUs; standardize spec blocks & check sheets.
- Consider in-house consolidation if the data supports it.

Hypothetical but realistic math
– Part: Hydraulic shaft, 1.00″ class, production run 1,200 parts
– Baseline: finish turning → outsource grinding & honing
Improved (Baxter in‑house grind + hone):
Math (to deliver 1,200 good parts):
Need functional surface finishes?
We quote based on process—not guesses.
In-house grinding & honing keeps tolerances tight and lead times short.
Send your print and we’ll build the right plan: turn → grind/hone → verify.

